Looking for 1:1 Success? You Need Ubiquity!

ipad_paperThere are lots of things that will make a 1:1 environment (iPads, Chromebooks, laptops, BYOD, etc.) successful, but without ubiquity you won’t find success. If you’re going to go 1:1 technology can’t be an extra thing, it has to permeate everything.

Think about it like this, the iPad is an educational tool. You wouldn’t hide your constructions paper or scissors or makers away and only get them out for special projects (I hope). If you do, that Social Studies project starts to become a construction paper and scissors project; the project becomes about the tool not the content.

The same is true for technology. If you keep it away and only get it out for a limited number of specific activities, that Science project starts to become a technology project.

If you want students to use technology effectively they need lots of practice. If they’re working in a content area you want them focusing their energy on the content, not how to use the tool (technology).

Sure, there are times when you want to unplug. I’m not suggesting that we go all-technology all-the-time, but if you want success the tool needs to be available as much as possible – like all their other school supplies/tools (construction paper, scissors, markers).

Creating a Google Custom Search Engine

Teaching students how to search effectively is essential. But letting an elementary student loose on Google makes a lot of people nervous (which is okay). School filters are good, but they aren’t perfect (which is also okay, but that’s another post altogether). A Google Custom Search Engine is a great compromise. It allows students to use the Google search engine, but it also allows you to limit the webpages and websites that are used for the results. And best of all, creating a Custom Search Engine is easy.

First, head over to www.google.com/cse.

Look for the blue botton that says, “Create custom search engine.”

Screenshot 2015-01-08 at 10.39.58 AM

If you’re not logged into a Google account, the blue button will ask you to sign in first.

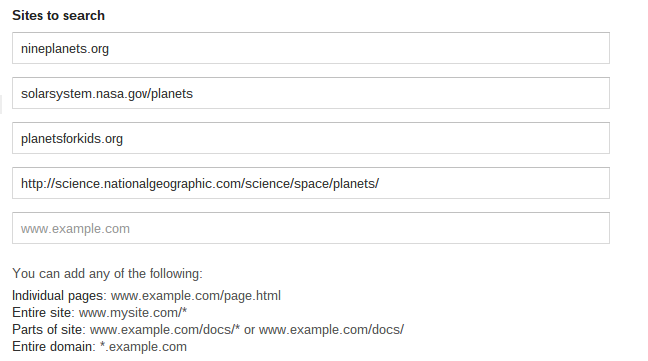
Second, you need to add the websites you want your Custom Search Engine to use. Every time you add a new site, an additional box will appear for you to add another. In my example I’ve added some sites with good information on planets.

Screenshot 2015-01-08 at 10.43.24 AM

Next, you name the search engine.

Screenshot 2015-01-08 at 10.43.40 AM

Finally, find the blue “Create” button.

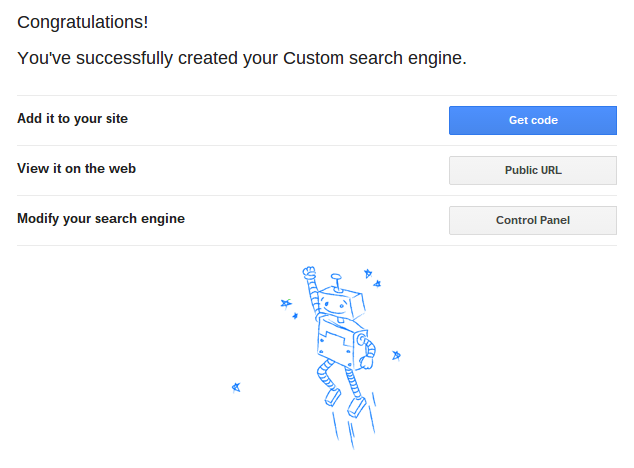
That’s it! It’s ready to go. You just need to get your students to the search page.

Screenshot 2015-01-08 at 10.44.34 AM

Here Google gives you three options – you can:

  1. Get code – if you want to embed your search engine in a webpage. Google will give you some javascript you can plug into a webpage.
  2. Public URL – if you want to have students navigate to your search engine. It’s a long URL so you’ll want to find a way for students to not type it all in (email it, put the link on a webpage, make a qr code, etc.)
  3. Access the Control Panel – if you want to go back and change the sites that your custom search engine uses.

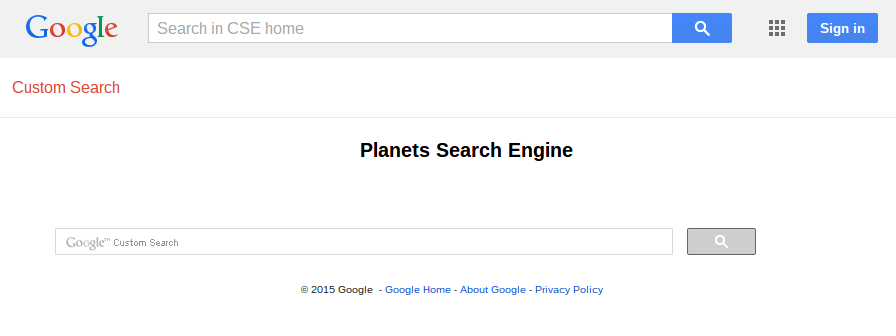
When I go to the link for my Planets Custom Search Engine (the link is: https://www.google.com/cse/publicurl?cx=017140682098558138880:20oohmnfel4, I wasn’t kidding when I was long), the search page looks like this:

Screenshot 2015-01-08 at 10.46.01 AM

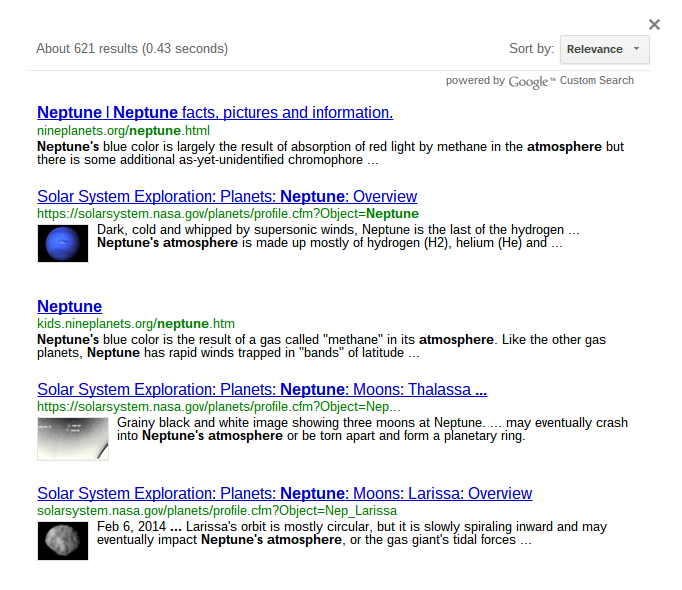
And when I search for neptune atmosphere I get this (only results from the sites I specified):

Screenshot 2015-01-08 at 10.47.36 AM

Note: If a student follows one of the search results, and then follows a link from within that page, they can access the rest of the web. The Custom Search Engine only limits the results of the search; it doesn’t block students from following links to other sites.

Searching is an important skill. If you can’t find what you’re looking for in the first page of your search results, you’re using the wrong search terms. But keeping our students safe while they explore this is important too.

From XKCD

Making Book Trailers Better: Legacy

iMovie-2.0-for-iOS-app-icon-smallMany teachers have used the iMovie Trailer function to make book trailers. But what do we do with them? How do we make sure those trailers last? How do we make sure students, lots of students, see those trailers? How do we make sure students use those trailers to help them choose books they’ll like (because that’s really the point of a trailer)?

QR Codes!

Okay, first, I don’t love QR codes; I know some teachers adore them. I think they have limited use, but this is definitely one of them.

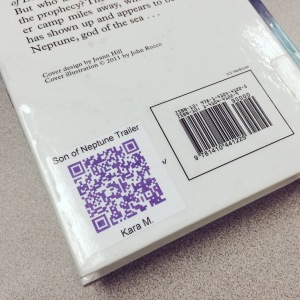
Book QR Code

Our first trailer. The student chose the color.

Once you make your trailer, put it in a public place on the web. We’re a Google Apps for Education (GAFE) district, so we put them in drive and then made them public to anyone with the link. Then create a QR code for the movie (we used the QRafter app and the QRStuff site). Then head to library and put that QR code on every copy of the book. Now, when students go to the library (we’re a 1:1 iPad district) they can scan the QR code and see a visual trailer for the book created by a student (in addition to the blurb on the back). If books are going to be displayed cover-out, put a copy of the QR code on the front too.

And (this is the best part), the movie file is stored in a stable place in the cloud. So as my elementary school students who created the trailers move through middle and high school the trailer will still be sitting in their Google Drive available for younger students to see it. Five or more years from now, students will be watching the trailers we created this year!

Our students do great work; make sure it isn’t lost when summer arrives. Help them create a legacy.


Note: I’ve written about iMovie trailers before. Here is a post with single-page, printable storyboards for all the trailer themes. Here is a post about using trailers as a way for students to introduce themselves to next year’s teacher. And here is a post about moving beyond trailers and getting into iMovie projects.

Elementary Homework, Is It Worth It?

Nearly every teacher has some pretty firm thoughts on homework. Most of it is anecdotal though – something like, I had homework and I turned out okay so students today should have the same experience I did. That sounds all well and good (though one could argue that the world is different today so our students’ experience school should also be different), but what does the research say about homework?

origin_2194119780To the Research:

Whenever anyone talks about research on homework it always seems to come back to a meta-analysis done by Harris Cooper in 2006 (he also did one in 1989). If you don’t have practice reading scholarly articles, it’s always tempting to read the abstract in the beginning and call it a day. Harris notes in the abstract:

“…there was generally consistent evidence or a positive influences of homework on achievement.”

Its tempting to just stop there; homework is a good thing. Though in the abstract he also notes that there is “a stronger correlation existed (a) in Grades 7-12 than in K-6 and (b) when students rather than parents reported time on homework.” So, students do a better job of reporting time spent on homework; that makes sense since students are the ones doing the homework. And homework seems to be more effective with older kids.

Sill, we’re left with the impression that homework is good for everyone.

But, the story isn’t over.

If we dig way down into the paper we find correlations for sub-groups. So, with math homework, there is a statistically significant positive correlation; this means that averaged across all grade levels, math homework makes you better at math. With reading this is also true, though to a slightly lesser extent.

It still feels like homework is a good thing for everyone, right?

But, when you separate the data by grade level, things get interesting. For grades 7-12, there is a positive correlation between homework and academic achievement. But for grades K-6, it gets a little murky.

“A significant, though small, negative relationship was found for elementary school students, using fixed-error assumptions, but a non-significant position relationship was found using random-error assumptions.”

What does that mean? It means depending on how you run the data you either get:

  1. Homework correlates with slightly lower academic achievement (small, but big enough that it’s statistically significant), or
  2. Homework correlates with slightly higher academic achievement (but so slight, that it’s not statistically significant – so it doesn’t count).

Yep, I said it (well, Cooper did). Homework in elementary school doesn’t increase academic achievement and might actually decrease it.

origin_12918347633But I Want to Teach My Students Good Study Habits

If you want your students to get in the habit of bringing school-related stuff home every night and bringing it back, that’s fine. I’ve heard many teachers make that argument and in the past I’ve even made it myself. But if that’s your goal, why not send home a piece of paper for parents to date, initial, and send back. You’re still teaching the bring-it-home-and-bring-it-back skill.

But Why Doesn’t Homework Help in Elementary School ?

Harris goes on to note that “younger children are less able … to ignore irrelevant information or stimulation in their environment” and “appear to have less effective study habits.” This shouldn’t be news to anyone who’s worked with young students; elementary students don’t have strong independent study skills when it comes to learning something new – that’s where good teachers come in.

Data Driven Decision Making

So why are we still doing this?

As schools focus more and more on data-driven decision-making (which is a good thing), why aren’t we looking at the data on homework?


Cooper, H., Robinson, C. R., Patel, E. A. “Does Homework Improve Academic Achievement? A Synthesis of Research, 1987-2003.” Review of Educational Research. Vol. 76, No. 1 (2006): pp. 1-62. Print.

photo credit: Cayusa via photopin cc
photo credit: davidmulder61 via photopin cc

#Chromebook Keyboard Shortcuts

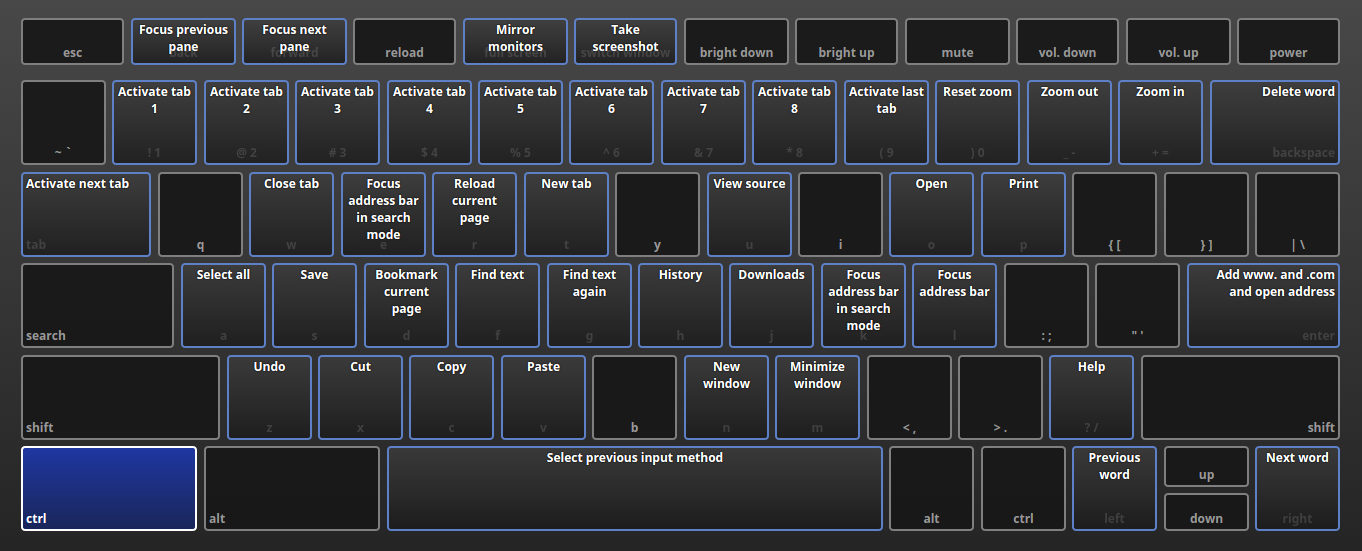
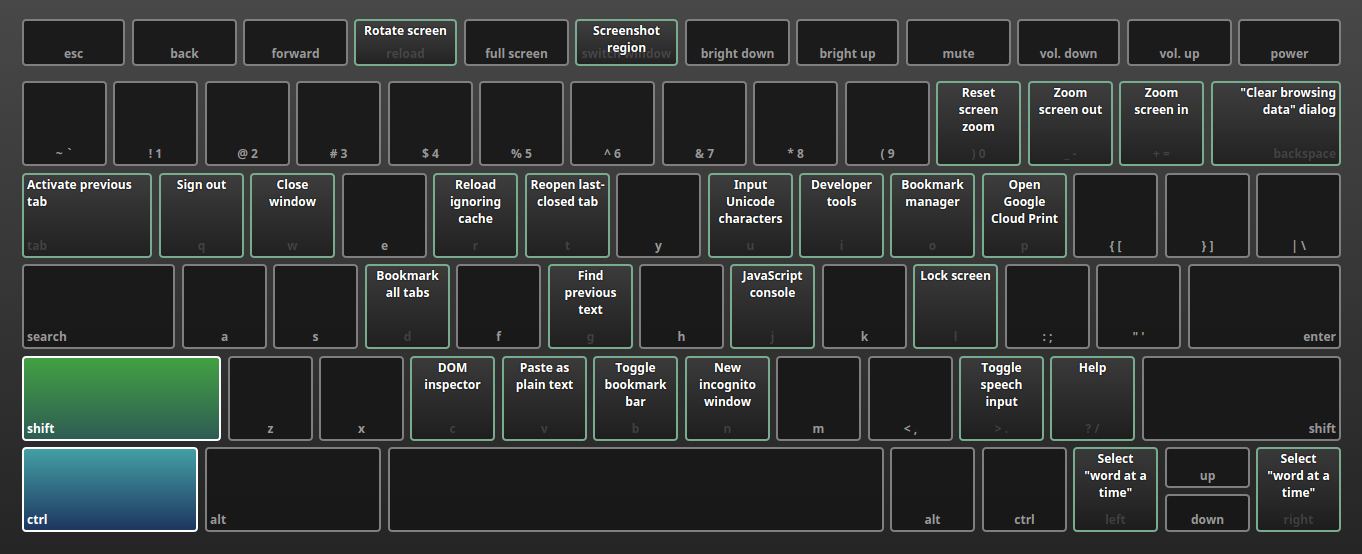
I’m a big fan of keyboard shortcuts (the alt-tab was a game-changer for me), so when I stumbled across this in my Chromebook’s settings, my mouth dropped. It’s beautiful interactive visual of how the keyboard functionality changes with the shortcut keys.

If you hold down the Control (ctrl) key, these are the shortcuts (click to enlarge):

Screenshot 2014-09-19 at 10.54.56 AM

If you hold down the Control (ctrl) and the Shift key, these are the shortcuts (click to enlarge):

Screenshot 2014-09-19 at 10.55.36 AM

There’s an awful lot you can quickly access.

On a Chromebook, use the URL chrome://keyboardoverlay/ to access this.

Getting Pics From Drive to Blogger, on a Chromebook

If you’ve ever tried to get pictures from your Google Drive to your (Google-owned) Blogger blog, you know that it can be a hassle. All the Google apps seem to play well together, except Blogger.

But on a Chromebook, it’s super-easy.

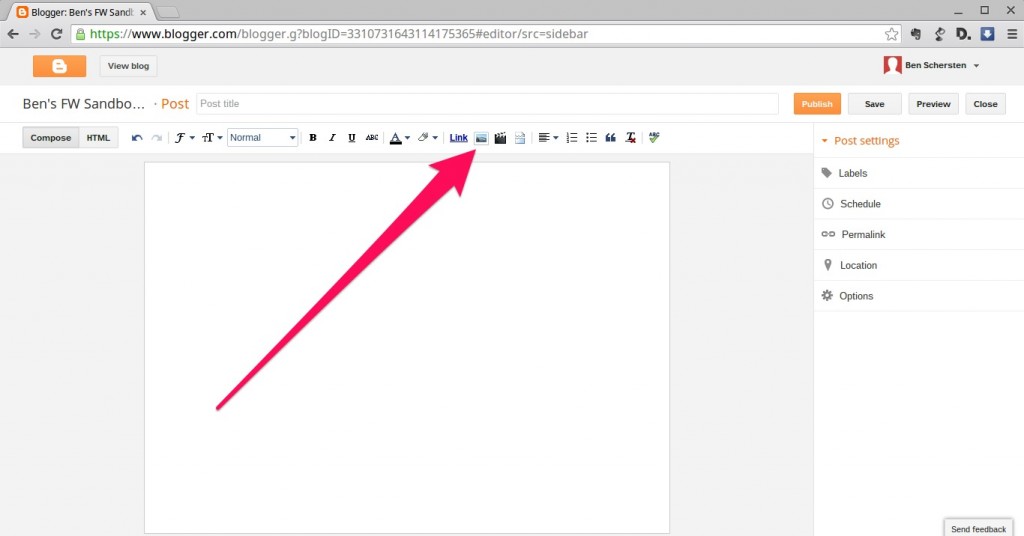
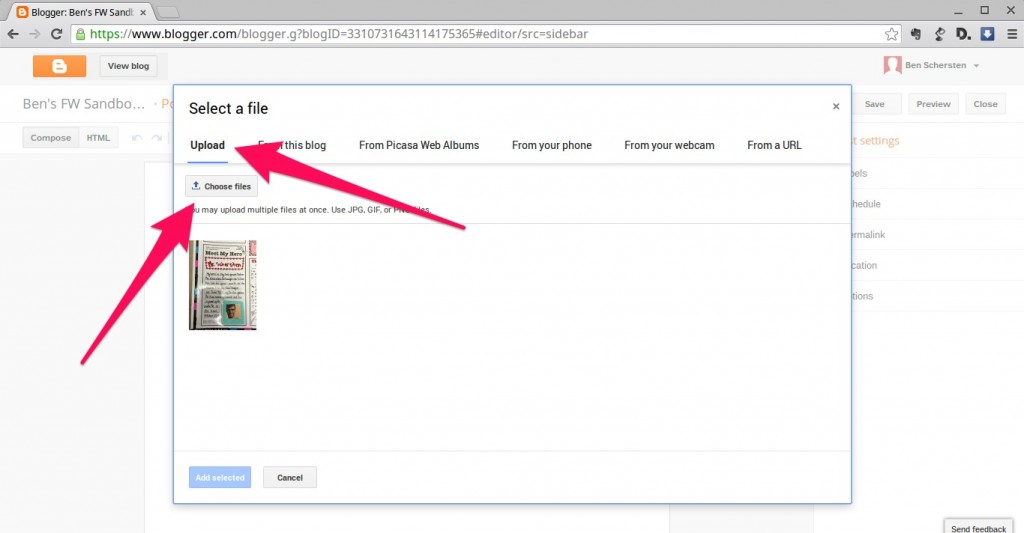
On the New/Edit Post page click the Insert Image icon.

photo 1

Then make sure you’re on Upload and click Choose Files.

photo 2

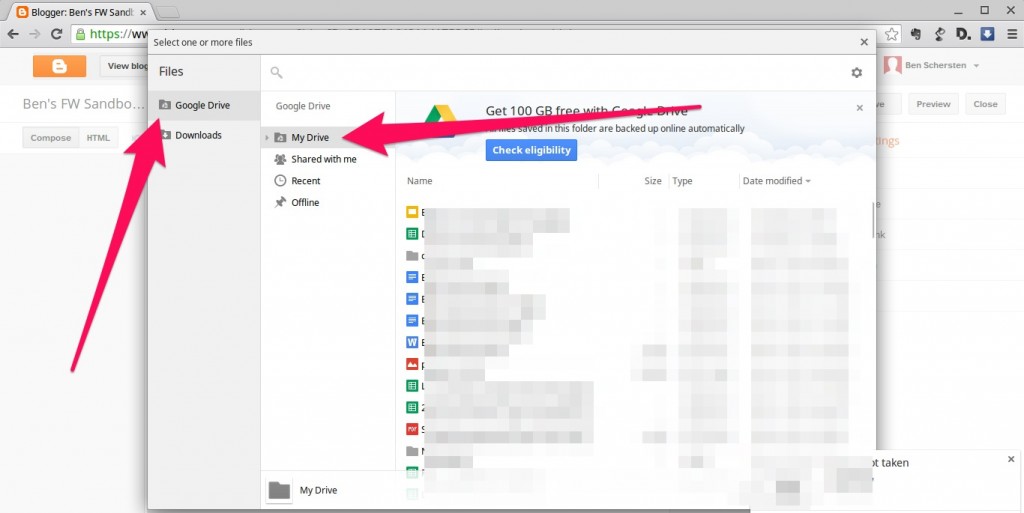
Make sure Google Drive is selected on the left, and you’ve got easy access to your entire Drive. You can even get to the Shared With Me (Incoming) and Recent sections.

photo 3

Find your picture, select it, click Open, select it after it loads, and click Add Selected.

With a Chromebook, it treats your Google Drive just like it’s your own hard drive. So anywhere online where you can upload a file/image, the Chromebook allows you to easily pull directly from your Google Drive.

Is Your School Year Winding Down or Winding Up?

origin_1581482As we head into the final weeks of the school year things start to wind down. Projects are due, and new ones don’t start. We start doing those end-of-year assessments that take us away from our daily and weekly routines. Homework tapers off. We all look forward to the relaxation and routine changes that come with summer vacation. But is this wind down as relaxing for the students as it is for the teachers?

I’ve written before about how students secretly hate vacations, and this certainly applies to summer vacation. For some students, summer is a time of travel and seeing family. For others it mean uncertainty and all-day day care. We all have students who crave the safety and routine that schools provide.

Keep an extra eye on those kids as the year winds down. Those kids look forward to the routine of the Monday morning fluency test in math, the Wednesday reading journal, or the Friday afternoon spelling quiz. Changing your routines may wind those kids up more than anything else. So even if deep down you know your grades are done and that that last week of spelling won’t actually count, consider giving it anyway. That continued routine is exactly what some of your students want (need) in those final weeks. (And you don’t have to tell your students that quiz won’t actually make it into the gradebook.)

photo credit: Ben McLeod via photopin cc

Embedding a PDF From Drive into a Blog

Embedding PDFs in a blog can be a great way to share information, especially with parents and the community. These days Google Drive makes this easy: when you’re viewing a PDF you can easily get the embed code and drop it into you blog. But, the code includes a preview pane and no options for zooming, so it’s not idea. The default Google Drive PDF embed code ends up creating this:

Getting the embed code is easy, but the result is in no way ideal. In fact you’ll notice that most of the first page of the PDF you can’t even see. Fortunately, there’s a better way. It take a little code (really, just a little), but it’s very doable.

The embed code Drive gives you looks like this (it’s what I used above):

<iframe src="https://docs.google.com/a/bpsk12.org/file/d/0B3xoQi_oa7_hU2J5S1RQbFdqS3c/preview" width="580" height="480"></iframe>

What we need to do though, is to use this code instead (it’s way better, for lots of reasons):

<iframe src="https://docs.google.com/viewer?srcid=[put your file id here]&pid=explorer&efh=false&a=v&chrome=false&embedded=true" width="580px" height="480px"></iframe>

I know, the code looks a little intimidating, but most if it we can ignore.

There are only three things in the code we need to worry about:

  1. The file id.
  2. The height of the frame.
  3. The width of the frame.

The file ID for your PDF (one that is already in Google Drive) can be found in the PDFs web address. When you open a PDF, it’s the garbage-looking piece of the URL (it will be between forward-slashes, “/”).

The file ID is highlighted in yellow.

The file ID is highlighted in yellow.

In this case it’s the 0B3xoQi_oa7_hU2J5S1RQbFdqS3c

That id will need to be placed into the code in place of the “[insert your file id here]”. Make sure to get rid of the square brackets in the sample code.

Height and width are exactly that, height and width. You can change these numbers (they’re measured in pixels) to change the size of the frame that you’re PDF is enclosed in.

And what does it look like? If we take this code (notice that I’ve inserted my file ID)

<iframe src="https://docs.google.com/viewer?srcid=0B3xoQi_oa7_hU2J5S1RQbFdqS3c&pid=explorer&efh=false&a=v&chrome=false&embedded=true" width="580px" height="480px"></iframe>

and put it into a blog (remember, when you’re embedding html code you have to use the HTML window of the editor, not the Compose window), you get this:

This is so much better. It zooms out so that the PDF is displayed page-width. There’s no preview pane. You can scroll down if there are multiple pages. There are zoom options if you want to zoom in. All the things we want when we embed a PDF.

A little code, and all the sudden that PDF becomes so much more user-friendly. But don’t forget, in Drive if you’re embedding a PDF you need to make the file public first, otherwise it won’t embed correctly. 

Note: I didn’t put this code together myself. I found it on a Google forum post here, from 2013, from user Yajeng.

Are You Just a Teacher or a Just Teacher?

origin_497731537Last week I read a blog post by Deborah Mills-Scofield on Switch & Shift called Are You Just a Leader or a Just Leader? Like many of the business leadership blog posts out there, it applies to teaching too. In fact, after reading it, I went back and reread it replacing “leader” with “teacher,” and “people” and “customer” with students. This left me with a great blog post, about management teaching.

Here’s some of the post, through an educator lens:

Being a leader teacher requires taking the right road, not the easy road. Treating our people students fairly requires judgment, subjectivity, and clear communication of expectations and goals on an ongoing basis since the world around us changes all the time. When we treat our people students equally but not fairly, we tell people our students it’s ok to underperform and under contribute undermining the morale of our dedicated and passionate people students and are then surprised when we get mediocre output and outcomes.

What if we modify the culture to recognize people students fairly, based on their work, effort, passion, and results – as individuals and teams? We will be surprised to see the positive difference it will make.

I versus You

…I often ask my corporate educator colleagues if focusing on ‘I’, on themselves, has really gotten them the career satisfaction they sought. As leaders teachers, we need to help our people students focus on the “You” – the customer student, the recipient of our services and products and you the employee. If we honestly ask ourselves who matters more, ‘I’, ourselves or ‘You’ our customers and people students, what is our answer?

A true leader teacher is a servant who leads. So, is the business education about our needs or the needs of ‘others’? Are we really focused on delighting our customers students (to quote my friend Steve Denning), which means we will delight our people students because they are working on meaningful, purposeful solutions to real needs (outcomes) that result revenues and profit (outputs) in learning that can be reinvested in the delighting our customers applied to their lives? Or, are we doing this for the next perk, the accolades from our peers, the prestige from our position? I’m not suggesting total altruism (though that’s not a bad idea!), but I am suggesting we ponder why we’re leading teaching and whom we’re leading teaching – is it about ‘I’ or about ‘You’? Can we really lead teach if it’s about us? Would we want to be led taught by someone who was all about himself? Does our leadership teaching truly reflect our why and who? If someone asked one of our people students who mattered to us, ‘I’ or ‘You’, what would they answer?

As we approach the middle of 2013 spring, ask yourself two questions: do you treat people students equally or fairly (or both) and does your leadership teaching, hence your classroom culture, value ‘You’ over ‘I’?

So, are you a just a teacher or a just teacher?

photo credit: InsideMyShell via photopin cc

iMovie Trailers and Coloring Books

iMovie-2.0-for-iOS-app-icon-smalliMovie on the iPad is pretty awesome. And the Trailer function is a great starting point (you can find my iMovieTrailer storyboards here). But remember, it’s just that – it’s just a starting point. Most of the teachers I know who have used it for a student project come away from the experience saying, “that was great, but now that I get it I wish it could do more.” Fortunately, you can.

photo (2)

You see, the Trailer function is a lot like a coloring book; all you can do is color in the lines. Sure, you can assign a project to your students using the Trailers and they’ll all come out different, but they’ll also all kind of be the same. It’s like a coloring book: each kid can use different colors, but they all kind of end up with the same picture.

So use the Trailers, and then grow out of them. Start using the Movie function. Start drawing with a blank piece of paper. There’s so much more you can do.

And here’s a generic iMovie Movie storyboard. I think it’s a good idea to have students do some planning before they get a camera in their hands.